
World News
How To Tie Dye At Home A Sweatshirt

Oct
Introduction
Tie-dyeing is a popular and creative way to add vibrant colors and unique patterns to your clothing. If you’re looking to tie-dye a sweatshirt at home, this guide will provide you with the necessary steps to achieve a beautiful and personalized design.
Step-by-Step Guide: Tie Dye Techniques for a Vibrant Sweatshirt
Tie dyeing is a fun and creative way to add a burst of color to your wardrobe. Whether you’re looking to revamp an old sweatshirt or create a unique piece from scratch, tie dyeing at home is a great option. In this step-by-step guide, we will walk you through the process of tie dyeing a sweatshirt, using various techniques to achieve a vibrant and eye-catching result.
You can see more: https://blacktrendtees.com/product/fedex-mascot-design-3d-hoodie/
First, gather all the necessary materials. You will need a plain sweatshirt, fabric dye in your desired colors, rubber bands, plastic squeeze bottles, plastic gloves, and a plastic tablecloth or garbage bags to protect your work surface. It’s important to choose fabric dye specifically made for tie dyeing, as it will provide the best results.
Start by prepping your sweatshirt. Make sure it is clean and dry before you begin. Lay it flat on your work surface and smooth out any wrinkles. If you want to create a specific pattern, now is the time to plan it out. You can fold, twist, or scrunch the fabric in different ways to achieve different effects.
Next, it’s time to mix your fabric dye. Follow the instructions on the dye packaging to ensure you get the right ratio of dye to water. Use plastic squeeze bottles to mix and apply the dye, as they allow for more control and precision. Put on your plastic gloves to protect your hands from staining.
Now comes the fun part – applying the dye to your sweatshirt. Start by choosing a color and applying it to a specific area of the sweatshirt. You can create stripes, spirals, or any other design you desire. Use the rubber bands to secure the fabric in place, creating distinct sections for each color. Remember to leave some white space between the sections to allow the colors to blend and create a vibrant effect.
Once you have applied the dye to your desired areas, let it sit for the recommended amount of time. This will allow the dye to penetrate the fabric and create a lasting color. The longer you let it sit, the more intense the colors will be. However, be careful not to let it sit for too long, as it may cause the colors to bleed together and create a muddy result.
After the dye has set, rinse your sweatshirt under cold water until the water runs clear. This will remove any excess dye and prevent it from staining other clothes in the future. Once rinsed, remove the rubber bands and unfold your sweatshirt to reveal the final design. Hang it up to dry, away from direct sunlight, to avoid fading.
Finally, once your sweatshirt is completely dry, it’s ready to wear and show off your tie dyeing skills. Pair it with jeans or leggings for a casual and colorful look. Remember, tie dyeing is all about experimentation and creativity, so don’t be afraid to try different techniques and color combinations to achieve your desired result.
In conclusion, tie dyeing a sweatshirt at home is a fun and rewarding DIY project. By following this step-by-step guide, you can create a vibrant and eye-catching sweatshirt that is uniquely yours. So gather your materials, unleash your creativity, and get ready to rock your one-of-a-kind tie dye creation.
Choosing the Right Dye and Materials for a Successful Tie Dye Sweatshirt Project
Tie dyeing is a fun and creative way to add a unique touch to your clothing. If you’re looking to tie dye a sweatshirt at home, it’s important to choose the right dye and materials for a successful project. In this article, we will guide you through the process of selecting the perfect dye and materials to ensure that your tie dye sweatshirt turns out beautifully.
The first step in tie dyeing a sweatshirt is to choose the right dye. There are various types of dyes available in the market, but for a vibrant and long-lasting result, it is recommended to use fiber reactive dyes. These dyes are specifically designed to bond with the fabric, resulting in colors that won’t fade easily. They are available in a wide range of colors, allowing you to unleash your creativity and experiment with different shades.
Once you have chosen the dye, it’s time to gather the necessary materials. You will need a white or light-colored sweatshirt made of natural fibers such as cotton or rayon. These materials absorb the dye better and produce more vibrant colors. Avoid using sweatshirts made of synthetic fibers as they may not hold the dye as well.

You can read more: https://blacktrendtees.com/product/fedex-mascot-design-3d-hoodie/
In addition to the sweatshirt, you will need a large plastic bucket or basin to mix the dye, rubber bands to create the tie dye patterns, and plastic gloves to protect your hands from staining. It’s also a good idea to have some plastic sheets or garbage bags to cover your work area and prevent any accidental spills.
Before starting the tie dye process, make sure to prewash the sweatshirt to remove any dirt or chemicals that may interfere with the dye absorption. Once the sweatshirt is clean and dry, you can begin the tie dyeing process.
To create different tie dye patterns, you can fold, twist, or scrunch the sweatshirt in various ways. Secure the folds or twists with rubber bands to create sections that will resist the dye. The areas covered by the rubber bands will remain white or lighter in color, while the exposed areas will absorb the dye.
Now it’s time to mix the dye according to the instructions on the package. Fill the plastic bucket or basin with warm water and add the dye powder, stirring until it is completely dissolved. Wear your plastic gloves to protect your hands and carefully place the sweatshirt into the dye bath, making sure that all areas are submerged.
Allow the sweatshirt to soak in the dye for the recommended time, usually around 30 minutes to an hour. The longer you leave it in the dye, the more intense the colors will be. However, be careful not to leave it for too long, as it may result in bleeding or fading of the colors.
Once the desired time has passed, carefully remove the sweatshirt from the dye bath and rinse it under cold water until the water runs clear. Remove the rubber bands and unfold the sweatshirt to reveal your unique tie dye pattern. Finally, wash the sweatshirt separately in cold water and hang it to dry.
By choosing the right dye and materials, you can create a stunning tie dye sweatshirt right at home. Remember to follow the instructions carefully and have fun experimenting with different patterns and colors. With a little creativity and patience, you’ll have a one-of-a-kind sweatshirt that you can proudly wear or gift to someone special.
Creative Tie Dye Patterns to Try on Your Sweatshirt at Home
Tie dye has been a popular trend for decades, and it’s no wonder why. The vibrant colors and unique patterns make for eye-catching and personalized clothing. If you’re looking to try your hand at tie dyeing a sweatshirt at home, you’re in luck. In this article, we’ll explore some creative tie dye patterns that you can easily achieve with a few simple materials.
Before we dive into the patterns, let’s go over the materials you’ll need. First and foremost, you’ll need a plain sweatshirt. Opt for a light-colored one to allow the dye to stand out. Next, gather some fabric dye in various colors. You can find fabric dye at most craft stores or online. Additionally, you’ll need rubber bands, plastic squeeze bottles, and plastic gloves to protect your hands from the dye.
Now that you have your materials ready, let’s move on to the first tie dye pattern: the spiral. To achieve this pattern, lay your sweatshirt flat on a table and pinch the center of the fabric. Begin twisting the fabric in a clockwise motion until it forms a tight spiral. Secure the spiral with rubber bands, making sure they are evenly spaced. Now, using your squeeze bottles, apply different colors of dye to each section of the spiral. Allow the dye to set for the recommended time, then rinse the sweatshirt until the water runs clear. Once dry, remove the rubber bands to reveal your beautiful spiral pattern.
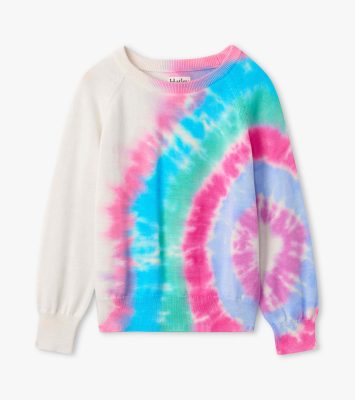
Next up is the bullseye pattern. Lay your sweatshirt flat and pinch the fabric in the center. Twist the fabric in a clockwise motion, just like with the spiral pattern. However, this time, instead of securing the entire spiral with rubber bands, place rubber bands at regular intervals along the spiral. Apply different colors of dye to each section, making sure to saturate the fabric thoroughly. Let the dye set, rinse, and remove the rubber bands. The result will be a stunning bullseye pattern that is sure to turn heads.
If you’re feeling adventurous, you can try the crumple pattern. Lay your sweatshirt flat and scrunch it up randomly, creating a crumpled effect. Secure the scrunched fabric with rubber bands, making sure they are evenly spaced. Apply different colors of dye to each section, allowing the colors to blend and mix. Let the dye set, rinse, and remove the rubber bands. The crumple pattern will give your sweatshirt a unique and abstract look.
Lastly, let’s explore the stripe pattern. Lay your sweatshirt flat and fold it accordion-style, creating vertical folds. Secure the folded fabric with rubber bands, spacing them evenly. Apply different colors of dye to each section, making sure to saturate the fabric thoroughly. Let the dye set, rinse, and remove the rubber bands. The result will be a stylish sweatshirt with vibrant vertical stripes.
Tie dyeing a sweatshirt at home is a fun and creative activity that allows you to express your personal style. With just a few materials and some imagination, you can achieve stunning tie dye patterns that are sure to impress. Whether you opt for the spiral, bullseye, crumple, or stripe pattern, your sweatshirt will be transformed into a one-of-a-kind piece of wearable art. So grab your materials and get ready to unleash your inner tie dye artist!
Conclusion
In conclusion, tying dye at home on a sweatshirt can be a fun and creative activity. By following the necessary steps, such as preparing the sweatshirt, choosing the desired dye colors, and applying the dye using various techniques, individuals can achieve unique and vibrant tie-dye patterns. It is important to carefully follow the instructions provided with the dye kit and take necessary safety precautions. With some patience and creativity, anyone can successfully tie-dye a sweatshirt at home.
You can read more: https://www.youtube.com/watch?v=22ylBPAulUU